Makeover for an Old Bag

So my lovely Longchamp tote... it's been a great bag as previously discussed in great detail here, but it's looking decided scruffy and worn. $145 over 10 years makes me feel like I've definitely got my money's worth out of it, but I just can't get rid of it because despite everything it's still wonderfully functional! So here are my easy DIY repairs which I feel have greatly refreshed this workhorse of a tote.

Before

After!
The easiest thing to tackle was the whiskers down the side seams, so I did that first. A sharp pair of scissors allowed me to carefully snip away those pesky wisps of fiber without disturbing the rest of the bag. Interestingly enough, as I looked closely at the whiskers I saw that the fabric underneath them was still just fine with a nice tight weave. The whiskery bits were just very very slender fibers that had come loose from the weave and were sticking out, sort of like when a sweater starts to pill. But after the bits sticking out were cut, the fabric of the bag looks amazing once more. Next up, the corners...

Before

After
Repairing the corners was definitely not as easy as getting rid of the whiskers, but it made a huge difference in the appearance of the tote and it wasn't hard to do at all. On a side note, one of the benefits of purchasing more expensive items is that they are often made of better materials that allow for repairs over the years, rather then materials that simply break down or disintegrate and cannot be fixed no matter how much you love the item. To start I turned my bag inside out.

With the bag inside out, you can clearly see the two damaged corners. Using a ruler and a white gel pen, I drew a straight light under the original seam that went past the holes. The ruler was not only to get a straight line but also to measure and make sure the line I was drawing was the same distance from the edge all the way across.

I wound up with this, which for my bag was about 2.5 cm from the edge. If you have a sewing machine, it will literally take you 2 seconds to stitch along the white line from one end to the other (make sure to backstitch on both sides for security!) I do have a sewing machine but I was insure if the thickness of the two layers and the coated fabric would play well with my machine's needle, so I decided to do the stitching by hand using some thick black thread. I'm pretty sure that my machine could've handled it though because it wasn't hard to sew through even by hand. I didn't even need to use a thimble!

An important thing to keep in mind when doing the sewing is to make sure that you are sewing straight across the two layers of the bag without any wrinkling on the underside. So before I drew my white line across I pinned clothespins all along the edge to get a sense of what it would look/feel like with both sides of my fabric perfectly flat and smooth against eachother. I didn't keep these on when I was sewing because they were too bulky, but I've seen people using quilting clips for this sort of thing and those seem to work very well. I've added these to my Amazon shopping basket, partly because they're useful and partly because the pink floral tin they come in is so cute! But this cheaper option (fewer clips) is also very tempting because of the bunny on the blue tin. Oh dear, I forsee a conflict in my Amazon future come check out time... surely I don't need TWO tins of quilting clips??

Continuing on! Here's what my stitches look like from the inside. Not the most perfect looking stitching I'll grant you, but they're strong and they run in a relatively straight line so I think they do the job!

I repeated this process on both sides of my bag, and now all four of my corners look perfect. I did make sure that the line I sewed was 2.5 cm from the edge on both sides of my bag in order to maintain the symmetry of the bag, so before you start sewing make sure whatever measurement you're using will work to take in the holes on all four corners. (So for example if one side requires you to sew in 3 cm but the other side needs only 2.5 cm, use 3 cm on both sides of the bag so that all the holes are taken in and both side are evenly taken in. If you did two different measurements on the two sides, your bag would be lopsided once you were finished.) One of my holes was a little larger and went further in than the rest so it's a good thing I took that into account before I started sewing.

When I was done sewing, I turned my bag back right side out without trimming the excess from the inside. This is what it looks like inside, and I think it's fine. If I had fabric with which to cover the raw edges that would be revealed by trimming off the extra, I would take that additional step but I don't, and I don't want to add in a different fabric when I'm not sure how it'll hold up over time. So this interior appearance is fine with me. With all the structural work done, it was time to turn my attention to the stains. Some people have tossed their Longhcamps into their washing machine with good results- supposedly the leather doesn't suffer. I decided to go the handwashing route instead, just to be sure. All my leather is still in incredible condition (firm yet supple, no cracks or damage) so I didn't want to take any chances!
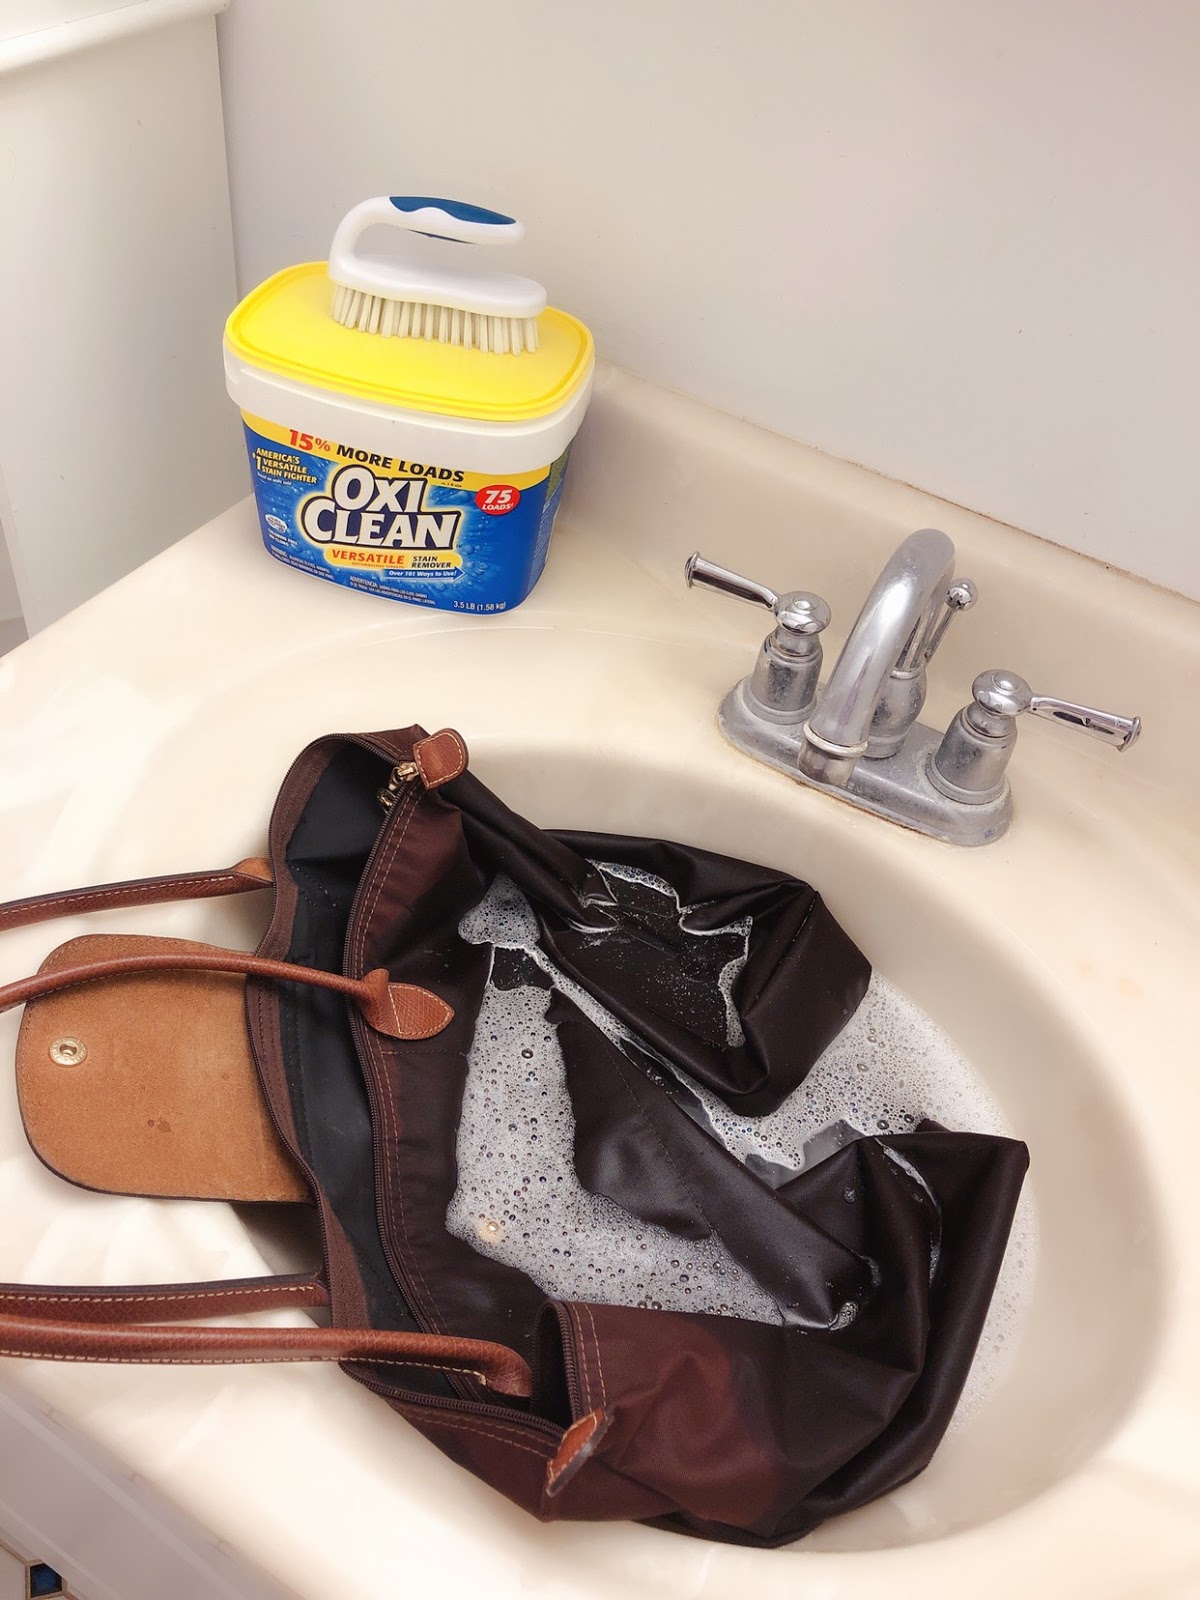
First I ran my tote and nice hot bath, with a generous helping of OxyClean. I let her soak in this pleasantly hot OxyClean bath for about 20 minutes (I'm not sure at what point my bag became a girl, but I'm definitely thinking of her as female for some reason). I didn't fully submerge my bag, partly due to my concerns about the leather and partly because it just wasn't necessary as most of the staining/dirt was on the lower portion of the bag anyway. After this thorough soak, I used the little brush to gently scrub the fabric, all the while taking care not too rub too harshly or vigorously because I didn't want to disturb the weave or cause any whiskering. After a thorough rinse to remove all the OxyClean water, I did rinse out the interior as well. While I had never really cleaned the outside of this bag before I had regularly given the interior a once over with a baby wipe so it wasn't too dirty, but I figured since she was already soaking wet I might as well wash everything!

This is how I hung her out to dry, hooking the shoulder straps across two chairs like so. Even though the bag was soaking wet because I didn't want to do any twisting or wringing out to remove the excess water, everything was perfectly dry within an hour.

And here she is now, in all her glory! No more stains, no more whiskers, and no more holes in the corners! The only real difference is that by taking in the bottom of the bag to fix the corners, I have changed her proportions by shortening her a little height-wise and making her bottom a little larger. Basically she's aged like a person! I think I can look forward to another 10 years worth of adventures!
**This post is not sponsored in any way. All links are posted for informational purposes only and earn no commission.**

Comments
Post a Comment