A Very Easy & Inexpensive Wreath DIY (with Bonus Bow tutorial)

Happy Holidays one and all! I can't believe it's already a week into December and I haven't shared any Christmassy awesomeness here! To start things off, here's a super super easy and cheap DIY wreath I made a couple days ago after a quick trip to Michael's.
~The Wreath~

These are all the supplies I used on this project. A wreath, wooden letters from the clearance aisle, some baker's twine, and an old bow I made several year ago.

To start I pulled the plastic hang tags off the letters and gave them a gentle sanding on the edges to smooth out any rough or splintery bits. If you don't have any sandpaper, use a nailfile! It's basically the same thing, especially the ones that are mounted on foam blocks! Originally I had figured I'd be painting the letters either white or gold, but I really like the pale natural wood color and they look adorably rustic so I decided to leave them unpainted.

The backs of my letters has these black stickers on them, but apart from the J where the sticker stuck out a bit and could be seen from the front, the other two weren't visible so I didn't bother removing them. The metal staples you see are where the plastic hand tags were affixed. I pulled off the plastic pretty easily but the staples remained, and I was going to pull them out too until I reconsidered...

Using my stapler I added another staple to the back of each letter, the idea being that they created two perfect loops to thread my string through! It wasn't super easy to get the staple to go into the wood so I had to hammer it a bit, but in the end they worked exactly as I hoped so it was worth the effort.

The baker's string was actually salvaged from a box of cookies purchased at a bakery! They use a tons of string to secure the boxes; I thought the red and white stripe was cute so instead of cutting through it I carefully unpicked the knot and wound it up to save for later. And I'm so glad I did, because red and white candy cane stripe is perfect for the holidays and best of all it didn't cost me anything! This is how I threaded my baker's string through the metal staples- I did a loop on each staple so that my letters wouldn't slide around freely on my string, but at the same time I could still shift and adjust them to get the spacing just right. Hot gluing the string to the back of the letters would definitely have been easier, but then you can't fiddle with the spacing and you have to get it perfect on the first try.
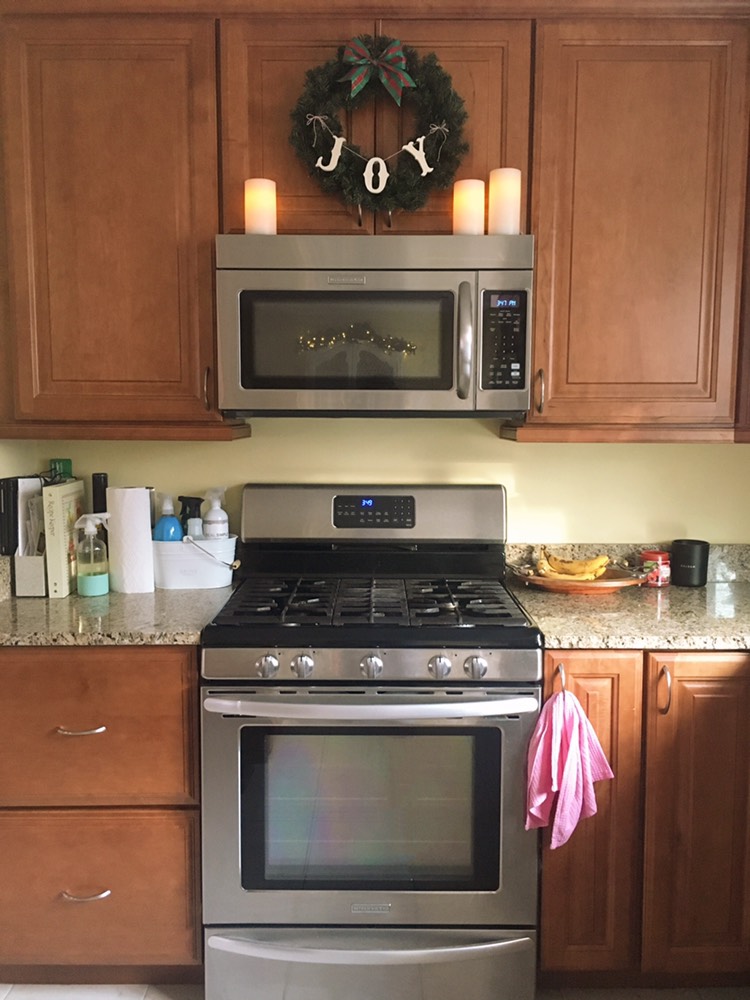
And here's the finished set up! This might seem like rather a jump but it's not- with my three letters strung up, I tied them to the bottom of my wreath and used a bit of wire to tie my bow to the top! Easy peasy! My joyful little wreath is the perfect decorative touch to that part of my kitchen; pretty to look at *and* out of the way (we don't use the cabinet about the microwave much). The electric candles balance perfectly on the top edge of the microwave and add a little soft flicker, which is nice because while I did consider adding a string of tiny fairy lights to the wreath, I decided against it due to the fact I didn't want to add to my list of things to turn on/off every day!
All in all, this wreath cost me less than $4 to make- $3 for the wreath and $.29 apiece for the letters. The salvaged string was of course free, and the bow I made two years ago was actually free as well (The ribbon I made it from looks nice in photos but it's absolutely horrendous-feeling plasticy stuff and I believe I got it for free from a church sale!)
~The Bow~
I suppose it's a bit of a cheat in this DIY that my bow was already made, but it was really really easy to make as well; all you need is a length of ribbon, some florists wire (or any kind of thin wire, even a pipe cleaner will do!) and a glue gun. Here's a quick rundown of how to make this very easy bow.

Start out with some wire and some ribbon. My ribbon was 2 inches wide, but you can use wider ribbon too. I prefer to use wired ribbon for bows because you can shape them so they're perfect, but for this example I used super cheap unwired ribbon and I still got a decent bow out of it.

Cut your length of ribbon and wire. I cut 23 inches of ribbon and 7 inches of wire, but the lengths you prefer may vary according to the width of your ribbon and the overall size of the bow you're trying to achieve. I usually cut the end of my ribbon before I start making my bow- just fold your ribbon in half and cut at an angle to get super pretty points. Make sure to start your cut from the fold, going down to the outside edge. When you unfold the ribbon, you'll have to perfectly symmetrical points.

After that hold your ribbon and arrange it into a loose bow shape simply by laying in flat and then pinch the middle in to great the proper bow shape. It's at this moment that you can easily make adjustments if the symmetry isn't right or if you want to pull the tails to be longer or shorter. Once I was happy with my pinched bow shape, I took my wire and while keeping the bow pinched with my fingers I wrapped the wire tightly around the center a few times. A couple of twists secure the wire in place and presto- you have a bow!

You may have noticed the center of the bow isn't very pretty, as the wire is super obvious. Never fear, because that's going to get covered up! I cut a short piece of ribbon, about 2 inches long. For this bow I used the same type of ribbon, but if you wanted to you could totally bring in a different design or color to mix things up.

Pinch the short ribbon piece in half and hot glue it together in the middle. Then pinch the one side and also glue it to the middle, and repeat on the other side. Once that end is done, repeat the three pinches and glues on the other side, ending up with a pleated candy-looking shape.

Then you take on end of your pinched candy shape and hot glue it to the back of your bow. Then loop it around the front of your bow and hot glue the other end down on the backside of the bow.

Your bow masterpiece is finished! You can make these bows really quickly and use them for all sorts of projects, especially around Christmas. They also make really good present bows, just hot glue to the top of the wrapped present and you're good to go!


Comments
Post a Comment