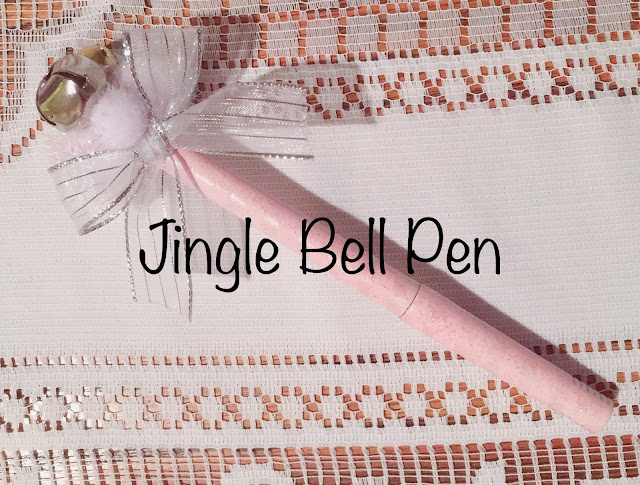
Joyful Jingles (yes, another DIY)
Completely unintentionally, I'm doing two DIY posts back to back! I've been working on writing my Christmas cards and as it's rather a long list, I needed to take a break to recharge my Christmas spirit. And what could be better that crafting to get one into a festive mood?
I wanted to do something quick and easy that would get me hyped to write more cards. Looking at my spread of cards, I suddenly thought why not jolly up my card-writing pen! A couple weeks ago I saw a cute pen with bells and pompoms on top at the dollar store that I really liked but I wasn't a huge fan of the ball-point style as I prefer to write with inkier pens. It was a pretty simple idea, just a striped pen (theirs was wrapped in ribbon to create the stripes) with pom poms and jingle bells stuck to the top. I was positive I could recreate it without breaking a sweat. Oh hubris...

Here were my general supplies for this project- spray paint, pom poms, and jingle bells. Lucky for me this past weekend included a trip to Home Depot where I picked up these two Rustoleum spray paints (Candy Pink and Pearl Mist). I was actually looking for flat white with another project in mind, but when I saw these two I thought they were so pretty I figured surely I'd find a use for them as well. Side note, I've included Amazon links for these because the pink is the same price I paid at Home Depot. The Pearl Mist was actually $2 cheaper at Home Depot, but Amazon prices fluctuate so it's possible at some point it might be cheaper online. The Champagne Gold Mist which I didn't buy but now kind of want to is currently listed at $6.76 which is definitely cheaper than Home Depot. Apart from the paint, I also had some sparkly poms poms and a few jingle bells laying around that were perfect to stick on top of my pen. Not shown are my glue gun (always a crafting essential) and a bit of ribbon I added on at the end. With no idea of the trials and tribulations that I would find myself facing, I was excited to get crafting!

Step one was to carefully tape off the parts of my pen I didn't want to be painted. As my pen has a cap, I knew that I didn't want any of the area that the cap slides over to have paint on it because it would either stick, peel, or both. I also didn't want the silver pen loop-thingy to get painted, and as I couldn't figure out how to remove it I decided to just really carefully tape it up as well.

Here's my hilarious set up for spraying the body of my pen- I stuck it inside the hole of a spool of ribbon to both give me a way to hold the pen while spraying it and also provide a base for the pen to remain on while drying so that it wouldn't touch anything. I didn't fancy getting spray paint all over my hand, sleeve, or ribbon spool, so I used a plastic bag as a shield. It might look funny but it did the trick! Despite that fact that it's been freezing outside and well below the temperature for spray painting, I decided to go for it anyway. My first coat was a bit spotty as you can see but I went slowly, let each layer dry, and built up. I think I did three layers of the pink for proper full coverage.

For the cap I wedged a chopstick in it which made the perfect long handle and using another plastic bag to protect my hand, I sprayed it as I had sprayed the pen. In theory, this should has been just as easy as doing the pen body. However....

The first spray I did was too heavy and formed a drip, so I thought I'd wash it off really quick before it dried and spray it again. Sounds reasonable right? Nope. Spray paint is sticky and it does NOT wash off with water. So all I accomplished was a messy blotchy pen cake and fingers covered in pink. Don't do this. And if you do do this, acetone will get the gunk of your hands really fast. Just remember to wash your hands with soap and moisturize after because it's super drying.
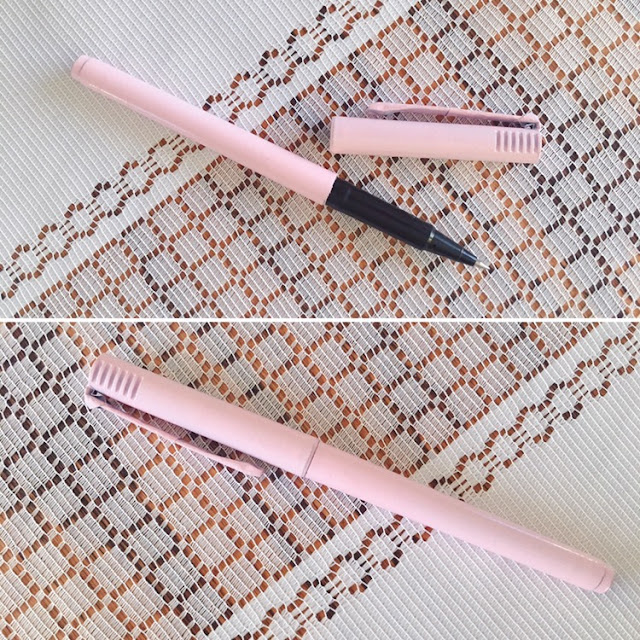

I took some skinny washi tape and taped a perfect spiral stripe, with the idea being that after I sprayed my pen with the pearl paint, I could peel off the washi tape and the result would be a gorgeous pink and pearly pink stripe all the way down. This plan worked great on the body of my pen (just look at that beautiful subtle stripe), but I don't know what went wrong with the pen cap... when I went to peel off the washi, my pink paint peeled with it! It was so horrible that I actually forgot to take a picture.

To try to salvage this disaster I took a fine paint brush and with some spray paint on a piece of paper went in to patch up the areas with missing pink. Honestly, it worked better than I thought it would, but it still wasn't great. Just look at that blotchyness and the uneven marks! So I considered my options....


While all this crazyness was going on, I also did a bit of bell customizing. My large silver bell and my small gold bell looked perfectly fine, but my middle sized gold bell was actually quite beat up. So it got the pink treatment. The paint adhered really well to the metal with just the first spray, and the second coat covered up the chipped areas even better. I wasn't looking for perfection on this bell because I knew that once it was glued down I wouldn't be able to see the chippy areas anyway. Best of all, the pink bell still jingle normally just like its unpainted friends. And how cute to have a pink, gold, and silver bell trio!

At this point, I was so ready for this project to be done. I had started on Monday and continued heavily into Tuesday, which definitely made this a not so quick and easy craft idea. I whipped out my hot glue gun and started gluing. First I glued my poms poms to each other in a triangle-ish shape (sorry no photos of the gluing because it all happened so fast). Then I glue them down securely to the top of my pen. Then I started adding my bells one at a time, starting with the largest one. After my bells were one I decided it needed a little something more, which resulted in a scrap of ribbon fashioned into a bow and hot glued on beneath the small pom pom.
And now you've seen my pink darling in all its glory, a beautiful sparkly pink striped jingly pen. The texture of it (glitter and all) is actually pretty smooth and it's not sticky or tacky at all thanks to the lovely matte poly sealant. It took me two days and probably $45 worth of supplies to make something I could've bought for $1, but I'm really happy with how it turned out and I love that it's pink. I'm too exhausted to pick up where I left off with my card writing though... maybe tomorrow!
** This post is not sponsored in any way but does contain affiliate links which may earn me a small commission if you make a purchase after clicking. There is absolutely no difference in the cost to you either way. Non affiliate links are included for informational purposes and earn no commission. **


Comments
Post a Comment